Tuesday, June 23, 2009

Ooey, Gooey, Sticky,Chewy

Coconut Chocolate Chunk Blondies are the best bar cookie ever! It's perfect for the person that loves a chewy, chocolaty cookie. They kind of taste like a Girl Scout Samoas cookie. An added bonus... they are so easy to make, a one bowl recipe.
I found this recipe over at Brown Eyed Baker's blog a few weeks ago, and made them right away. Sadly they were gone before I could even get a picture.
So, here they are, the second time around, just as delicious as the first. The only alteration I made was adding a little sprinkling of coconut to the top before baking. Give them a try, you won't be sorry. Well, maybe your thighs will be, but totally worth it!


1 cup flour
1/8 tsp. salt
4 oz (1 stick) unsalted butter, melted and cooled to room temperature
1 cup packed light brown sugar
1 large egg
1 1/2 tsp. pure vanilla extract
1 cup sweetened flaked coconut
1 cup bittersweet chocolate chips or chunks
Topping
1 cup bittersweet chocolate chips
1 tsp. butter
additional coconut for sprinkling (optional)
Preheat oven to 350 degrees. grease and flour (baker's joy) an 8 inch square baking pan.
Combine flour and salt; set aside.
Stir together melted butter and brown sugar until smooth; beat in egg and vanilla until well blended.
Slowly beat in flour mixtue until blended, then stir in coconut and chocolate chunks.
Scrape the batter into prepared and smooth even with spatula. Sprinkle with extra coconut if using.
Bake 25 to 30 minutes or until set in the center, but still soft. Do not over bake.
Let the bars cool slightly before drizzling with chocolate. Cool completely before slicing.
For Topping: Combine chocolate and butter in microwave safe bowl. Microwave in 30 second intervals. Drizzle.

Monday, June 22, 2009

They Make Really Great Cupcakes Too...

Ever since I made the Pink Champagne Cake from Cuisine at Home magazine, I have been wanting to try it in a cupcake. I made a little hole in the center with an apple corer, and filled it with the frosting that goes in the center of the cake, then frosted as directed, baking them for about 18 min. You can find the recipe here.

Saturday, June 20, 2009

Lemon Pudding Cake

One of my favorite flavors is lemon, and I love Lemon Pudding Cake! It's kind of like a Chocolate Lava Cake, but lemon.When I was a kid my mom used to make Lemon Pudding Cake all the time, although I always thought she made it from a box mix??? I recently borrowed her recipe book, and there it was... a recipe for Lemon Pudding Cake. I don't think I've had it since I was little, (I could never find a box mix ha ha)and when I explained it, nobody knew what I was talking about, but there it was in her book.
I did make a few adjustments (sorry mom, I adapted your recipe ;) ) the original recipe called for a lot of sugar! It was as delicious as I remember!


Lemon Pudding Cake

1/4 cup sifted flour
1/4 tsp. salt
3/4 cup sugar
1/4 cup fresh lemon juice
1 1/2 tsp. fresh lemon zest
3 egg yolks, room temperature
3 egg whites, room temperature
1 cup milk
Preheat oven to 350 degrees. Lightly butter 6 (8 oz.) ramekins and lightly sprinkle with sugar tapping out the excess. Heat water in a kettle to make a water bath. In a baking pan, place a towel in the bottom and the prepared ramekins on top of the towel.
In a large bowl whisk sugar and egg yolks until smooth and light yellow. Add flour, mix until combined. Slowly add milk, whisking until combined. Add lemon juice and lemon rind, mix until combined and set aside. With an electric mixer, or in a stand mixer, beat the egg whites and salt until stiff. Gently fold into sugar/lemon mixture in 3 additions. Batter will be runny. Fill prepared ramekins almost to the top. Place pan in oven and pour water in pan so it reaches halfway up the side of the ramekins. Bake 20 to 25 minutes, until puffed and lightly golden on top. Remove from pan and cool on wire rack. Serve warm or at room temp. Sprinkle with powdered sugar.

Sunday, June 14, 2009

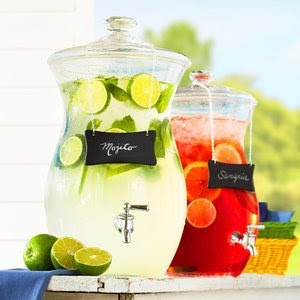
Beverage Dispensers


Roost Beverage Dispenser-Cairo

Planning an out-door Summer get-together? Wouldn't one of these look nice on your buffet table?

In All it's Glory

When I moved into this house (3 years ago this month) I remember how happy I was to see Hydrangeas blooming outside my window. This is something I now look forward to every year.

Saturday, June 13, 2009

Peach Cobbler

It's finally that time of year! If you like a lot of cobbler on your peach cobbler, then this recipe is for you. I have been making this cobbler for years...it's my families favorite summer dessert.


Peach Cobbler
FOR THE FILLING
4 cups (about 6 medium) fresh peaches
1/2 cup sugar ( use a little less if you don't like your cobbler really sweet)
1 Tablespoon cornstarch
1 teaspoon lemon juice
1/4 teaspoon cinnamon

FOR THE COBBLER
3/4 cup sugar
3/4 cup flour
3/4 teaspoon baking powder
1/4 teaspoon salt
3 Tablespoons unsalted butter, at room temperature
2 eggs, at room temperature
Preheat oven to 400 degrees. Spray a 2 quart casserole dish with cooking spray.
For the filling:
Peel and slice fresh peaches. Add lemon juice and set aside. in a small bowl mix together sugar, cinnamon, and cornstarch. Put peaches and sugar mixture in a 3 quart saucepan and cook stirring constantly until mixture thickens and boils. Boil and stir 1 minute. Pour into prepared casserole.
For the cobbler:
In a medium size bowl, whisk together the flour, baking powder and salt. Mix in butter and eggs with a wooden spoon. Mix until soft dough forms. Drop spoonfuls of dough onto peach mixture. Topping will spread as it bakes. Bake for 35 minutes, until golden brown.
(Halfway through baking time, sprinkle with teaspoon of sugar, if desired)

Wednesday, June 10, 2009

Pink Champagne Cake

The nice folks at Cuisine at Home magazine has generously given me permission to share their recipe for this fabulous Pink Champagne Cake. It's in their June issue, which by the way has several recipes that I have bookmarked to try.
I have made this cake twice in a week, once for a friend's birthday, and again for "girl's night". Yes, it was served with champagne... and it was delicious!


Pink Champagne Cake
with sparkling white frosting

FOR THE CAKE-

2 1/2 cups sifted cake flour

1 Tbsp. baking powder

1/2 tsp. table salt

1 1/2 sticks unsalted butter, softened

2 cups granulated sugar

3/4 cup brut sparkling wine

1/4 cup milk

1 tsp. vanilla extract

6 drops red food coloring

6 egg whites

FOR THE FROSTING-

1/2 cup shortening

1/3 cup brut sparkling wine

5 cups sifted powdered sugar

1/2 tsp. unflavored gelatin

1 Tbsp. cold water

3/4 cup heavy cream

Preheat oven to 350 degrees. Line two 9-inch round cake pans with parchment paper and coat with nonstick spray. Sift together flour, baking powder, and salt; set aside.

Cream butter and granulated sugar in a stand mixer until mixture is light and fluffy, about 3 minutes. Combine 3/4 cup sparkling wine, milk, and vanilla.

Add flour and wine mixtures alternately to butter mixture, combining well after each addition. Tint batter with red food coloring.

Beat egg whites in a separate bowl with clean beaters until soft peaks form, about 2 minutes. Fold egg whites into cake batter in thirds, stopping as soon as whites are incorporated. Divide batter evenly between prepared pans.

Bake cakes until a toothpick inserted in the center has only or or two crumbs on it, about 30 minutes. Cool cakes in pans for 10 minutes, then turn cakes out onto a rack to cool completely.

Beat together shortening, 1/3 cup sparkling wine, and powdered sugar for frosting in a bowl until smooth. Spread 1 cup frosting on top of one cooled cake round. Place second cake round on top of the frosted round.

Sprinkle gelatin into water in a small saucepan. Let mixture sit for 5 minutes, then gently warm over low heat until gelatin dissolves. Cool to room temperature.

Beat heavy cream until soft peaks form, about 3 minutes. Add gelatin mixture to cream; continue to beat until stiff peaks form. Working in batches, gently fold whipped cream into remaining frosting.

Spread frosting onto top and sides of cake, being careful not to overwork. Refrigerate cake 1 hour with a large bowl over the top to protect frosting. Use a spatula to gently swirl frosting before serving.

Copyright: 1996- 2009 August Home Publishing. All rights reserved.


Don't you think this cake would be perfect on one of the cake stands shown on my last post???

Cake Stands

My new obsession (well, maybe not new) here are a few that are sparking my interest right now.


Tuesday, June 9, 2009

St. Helena

We took a little road trip to St. Helena with the girls today. The weather was perfect, everything was green and beautiful.
One of our favorite places to stop at...Dean and Deluca.


I have an obsession with these little spice containers ;)

We stopped at Fideaux, Roxy got a new bed (she hopped in it at the store, and hasn't gotten out of it yet) and the girls got lots of treats.

Tuesday, June 2, 2009

Applesauce-Spice Cupcakes with Brown Sugar Cream Cheese Frosting


I spent the last day pouring over the much anticipated Martha Stewart's Cupcakes book.
Last night I made the Applesauce-spice cupcakes with brown sugar cream cheese frosting. The frosting is unbelievable! I would have never thought to use brown sugar, but it's really perfect on these cupcakes.

If you haven't picked up the new book yet, you can find the recipe here.

Chile Cheese Squares


They kind of look like a dense snack cake don't they? But really there is chili in it...you can see it in the bottom. This is a recipe that my mom used to make when I was a kid, they are really quick and easy. A great addition to taco night. Cut a little smaller, and they would make a great appetizer.

Chili Cheese Squares

1 can chopped chilies (4 oz) drained

2 cups shredded Monterey Jack Cheese

1 cup Bisquick mix

1 cup half and half

4 large eggs

Preheat oven to 375 degrees.

Spray a 9x9x2 inch pan with cooking spray. Sprinkle chilies on bottom of pan, and then the cheese on top. In a bowl, beat the remaining ingredients until smooth. Pour over chili and cheese mixture. Bake until golden brown and knife inserted in center comes out clean. 30- 35 minutes. Let stand for 10 minutes before cutting into squares.

I actually made these a little figure friendlier, and used Heart Smart Bisquick, lower fat monterey jack cheese, and egg substitute. They were just as delicious! Next time I will try substituting milk for the half and half.